To start my home lab journey, I decided to rebuild my network from scratch with some equipment that would allow me a bit more control than most consumer grade stuff. I thought that would be a good place to start as it supports a lot of the things I’ll be doing down the road.
Hardware
I went with all Ubiquiti gear for ease of use as far as pushing changes is concerned. I’ve got one control plane, and any changes are automatically applied to whatever device needs the changes applied.
- Ubiquiti Dream Machine Pro
- Ubiquiti USW-24-POE Switch
- Ubiquiti U6+ Access Point
Initial Install & Configuration
I started by racking and booting the UDM Pro. The first boot takes a few minutes, and the front panel display shows the progress. I decided to configure the UDM offline, without using a Ubiquiti cloud account and not allowing remote access. I want to minimize any potential attack surface and not expose any services to WAN.
I connected my laptop via Ethernet with a static IP in the expected range, but couldn’t access the GUI. After a bit of trial and error—including switching cables, ports, and DHCP settings, I realized the issue was an IP conflict with the VirtualBox adapters. Once that was resolved, I had local access and could get started with the configuration.
To complete the basic local setup:
- Assigned a local admin password
- Verified IP and connectivity
- Ran a speed test (645 Mbps down/up, not bad for coax!)
Switch Setup
Next, I powered up the USW-24-POE switch, connected it to the UDM, then adopted it in UniFi Network. UniFi Network runs on the UDM, there is no need for a standalone service in this case. I assigned the switch a static IP. Using custom length Ethernet cables crimped with T568B for consistency. I then configured a port on the switch to live on the management VLAN and connected my laptop to the switch and verified proper DHCP function.
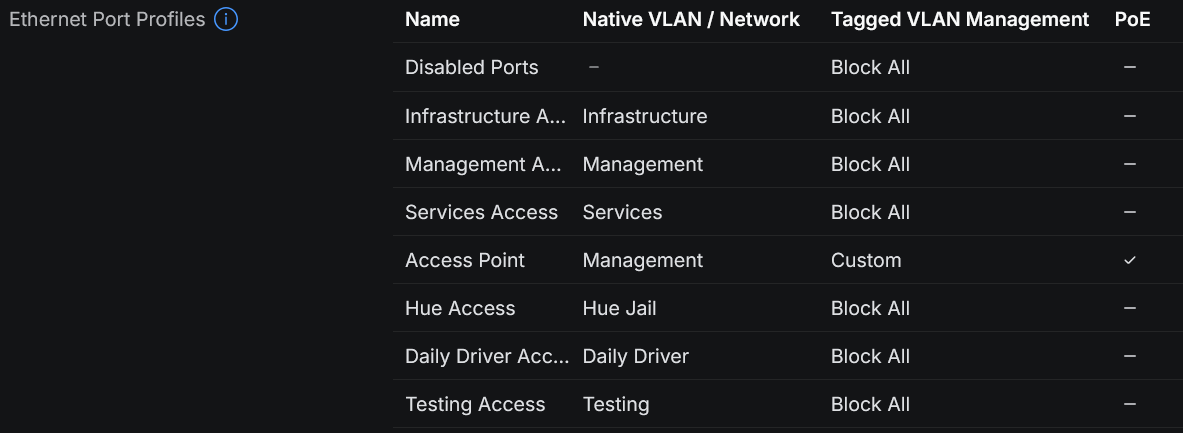
Port profiles were created to simplify future configuration:
- Disabled Port for unused ports
- Access ports for each VLAN
- Trunk port for Access Point (PoE + Management VLAN + required tagged VLANs)
Firewall, VLANs & Security
After the initial switch configuration, I focused on tightening security a bit:
- Disabled UPnP
- Verified WAN cannot access the management interface
- Enabled Intrusion Detection (IDS) via CyberSecure, starting with free ruleset (Notify mode)
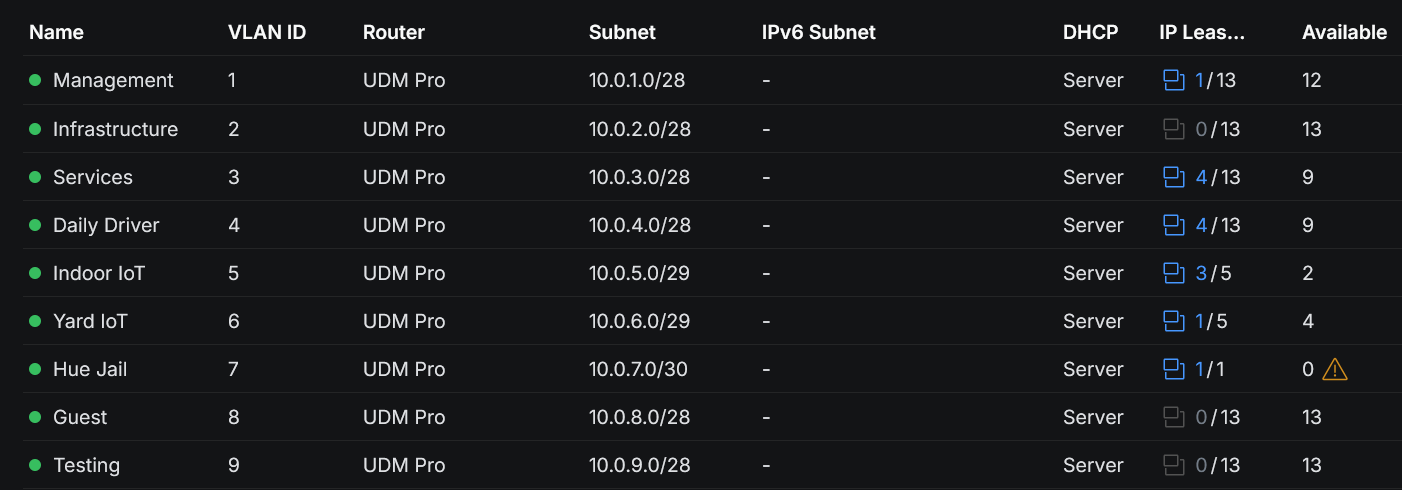
- Created all of the VLANs to segment the LAN
- Default security posture set to Block All for new VLANs
- Created granular rules, e.g., “Laptop Comms” with selective Allow list access
DHCP Reservations were assigned for key devices to simplify firewall rules and migration later.
IGMP snooping was enabled to reduce unnecessary chatter on all VLANs with “Forward Unknown Multicast Traffic” set to drop, and “Fast Leave” enabled.
Access Point Setup
The U6+ AP was mounted using the included template and long screws, with Ethernet run to a PoE port on the switch. I adopted the AP via UniFi Network and applied the Access Point port profile that I created earlier (Management VLAN, trunking only required VLANs).
Wi-Fi SSIDs, passwords, and security settings were cloned from the old network to ensure smooth device migration, with the SSIDs being associated with the proper VLANs.
Migration
I shut down the old network and brought the modem into the rack. A small hiccup with a bent coax pin led to a frantic run to the store for a replacement cable because of course it was near closing time on the weekend.
After installing the new coax cable and still not receiving WAN, I tested the patch from the modem to the UDM with a known good cable. Despite the patch cable working before, that turned out to be the issue. After making a new Ethernet cable, the network gained WAN connectivity.
Once the new network was up, devices joined the new Wi-Fi without issue and automatically picked up their new IPs.
My NAS and my Raspberry Pi that runs some automations were a bit trickier to migrate. I had configured each endpoint to accept connections only from specific IPs which were on the old 192.168.x.y range. (I switched to 10.0.x.y for the new network because I hate typing 192.168.x.y repeatedly.) No fear though, I just created temporary migration VLANs on the UDM which used the old IP ranges. I gained access, removed the restrictions, then reassigned the switch ports to the new VLAN. After that, I could re-enable my restrictions and lock the endpoints down on the new IP ranges.
In TrueNAS, the restrictions were applied through the network settings in the GUI, on the Pi, I was using UFW. This was done to limit which endpoints on the network can talk to each of those endpoints and which ports are allowed to be used. In theory, the firewall rules should handle this if traffic is crossing VLAN boundaries, but why not have layers when these things are easy to implement?
Tips
- Try to do these things when stores are not about to close so you don’t need to scramble if you need to go buy parts.
- Set your default deny policy and lock things down early. Ubiquiti will default to an allow all posture for inter-VLAN comms.
- Ubiquiti’s feature to create port profiles makes things nice. Spending time up front to make port profiles for each VLAN makes things easy down the road, especially months later when you might forget what settings you used for a given port on the same VLAN.
- When you think your plan is perfect, things will still go sideways. Don’t rush, take breaks, give yourself plenty of time.